 What could be more tragic, than to realize that your team cannot into Scrum? Or any other framework, supported by Microsoft Visual Studio 2010 Team Foundation Server. One day you just wake up with a single most powerful desire – to end this pain, no matter what. And this “what” could be really painful as well, as it could mean migration, and if you are not scared yet – you should be, and I’ll tell you why.
It’s not that hard to convince your developers to use new framework. For example – move to or from Scrum. And having the TFS schema, it shouldn’t be a big deal to start using it in a new project as well. Only if you don’t have a legacy mammoth solution which still holds memories of young and promising you.
So here is a story of a project that was started in Microsoft Visual SourceSafe, and then migrated to Visual Studio Team Foundation Server 2010 with MS Scrum schema. After one year of heavy and quite pleasant use, it was scheduled to be relocated to another TFS server, and the new schema has to be the default MSF for Agile Software Development V5.0.
When this project just made it’s first step from Visual Source Safe into the TFS, the standard migration utility took all the load – all the source code and change history was migrated in one session and it took about 15 minutes to complete. A few months later our developers couldn’t imagine software development process without using the Team Foundation Server. But then we realized that Scrum, although it is a perfect development schema for creative teams, is not optimal for our team, and regarding our TFS-related habits, we shall emphasize on workflow control, rather than frenzy coding.
And as if this was not enough, the existing project had to be split up into a number of new projects and about 30 other projects had to be relocated to the same target TFS server from two other TFS servers. So, dozens of solutions from 3 servers using 3 different schemas, migrated to one Team Foundation Server and to one, default, schema.
Now let’s imagine for a moment that you didn’t find this post in Google and so you don’t understand the scale of the tragedy, yet.
What is a TFS project
Technically, it’s a database. A SQL Server database of a significant size. Just one project of the mentioned dozens, generated backups worth 6Gb, daily. The database contains every sneeze any project member did while working on a project.
Technically, TFS server stores data in form of metadata. Which means that the same database could hold project of any schema without making changes into the structure of the database. You don’t add fields into TFS database, you add records to special tables, and these records describe your business object types (work items, for example).
All changes you make to your source code, are stored in the database as well, and that also explains it’s size. Labs management, testing, permissions – it’s all there as well. However, not everything is stored in the main database.
If you have a SharePoint frontend configured, then it has it’s own database as well. Your users may have their custom dashboards and other stuff that is not directly related to Team Foundation Server, so another 5 Mb is that database.
And, of course, you are using the SQL Server Reporting Services, which has yet another database, which could be 1 Mb or more. Microsoft System Center Virtual Machine Manager, used for automated testing within TFS, has it’s own database, so add this as well. Although VMM is irrelevant in this case.
During the migration we are trying to get the information from main TFS database only, and put all useful information we can find in it into the new schema.
What is the TFS schema
The list of fields and workflow (the underlying algorithm and rule set), which connects them. For example, in Scrum you have backlog items, but in Agile you have user stories. They are similar, but not the same. Also, one schema may store data in HTML, and other in plain text form – in that case you could, potentially, migrate that information, but then converted objects will contain barely readable HTML markup.
Overall, the schema defines the structure of your work items and links them. All schemas have something in common, and there is a base set of fields which they use. The problems starts when there are custom fields which have to be either migrated to other fields or dropped.
A very important fact is that even though the fields in different schemas may be the same, the values could (and most likely are) different. For example, the default schema, the Microsoft Agile V5, has only two states for Task work item – Active and Closed. Scrum, on the other hand, has such states as “To Do” and “Blocked” (meaning – it has impediment which doesn’t allow you to complete it until the problem is resolved).
So first thing during migration is to migrate the work items, but another thing is to fix the field values.
After Migration
The biggest problem would be to recreate all the work items from scratch, and you solve that problem with migration. However, fixing the field values might be the problem as well, although it can be easily solved by SQL query. Remember? The TFS project is an SQL database!
If your task has some problem in it – like the user is not in the list of available users anymore or state of the work item is invalid or any other list value can’t be found in the list – you won’t assign the changeset to that work item or do other things which involve changing the affected work item, until you solve that problem. You can do that either manually using the project portal / Visual Studio, or as a batch using 3rd party tool or SQL Management Studio.
Migrating Team Foundation Server Project
In this example we’ll migrate the project from either CMMI or Scrum schema to default MSF for Agile Software Development V5.0.
First thing first. Ensure that your developers finished their work with the old TFS. All code is checked in and they downloaded the latest code from repository. That is required so you would have an additional level of protection against the code loss.
Ensure you have SQL Server installed somewhere. It could be Express edition of SQL Server 2008, installed on your machine. Either way, it shouldn’t be the SQL server responsible for your TFS server, and much better if it will be on a machine in your local area network, but preferably on your own machine.
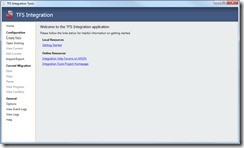
For migration itself, your main tool will be the TFS Integration Platform. Download it and install. Even if you’ve downloaded it just a month ago – check for new version now, as it’s one of the buggiest programs in your inventory so far.
TFS Integration Platform is using it’s own database for storing intermediate data, so it will consume a lot of RAM. I once tried to migrate one project and the TFS Integration Platform database was located at the same place where the TFS database was. That server has 16Gb of RAM and it wasn’t sufficient. When I retried that action using my own machine, it only took about 3Gb of RAM and the process was much faster. Approximately 10 minutes against 45.
As for the date of this article, the TFS Integration Platform has such behavior that you should be aware of:
- The target TFS project should exist before you run the TFS Integration Platform application. If not – close the application, create the project and start the application again. It seems it caches data and doesn’t refresh it.
- If you change the configuration file during conflict resolving, the configuration will be changed, but not applied. You will need to restart application.
- In all other problems – restart the application. If you were in the middle of migration process, it’s ok – work items won’t be migrated twice and this will not cause any conflict.
This is totally fine, as the application is in Beta state and you get it for free.
TFS Integration Platform architecture at glance
It’s an application, which reads the configuration from the XML file and connects to source Team Foundation Server, as well as to the target Team Foundation Server. So, all the settings you need will be stored in the XML file, and you’d better be familiar with XML.
Preparation steps for Migrating the Team Foundation Server project
- Create the target TFS project with the new schema
- Open Source Control of the target project, add new items to source control and check-in
- Open the migration tool as administrator.

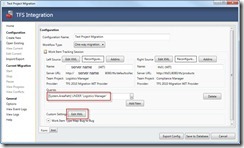
- Click “Create New”. In the dialog go to Team Foundation Server and select the WorkItemTracking_ExplicitFieldMap.xml
- Now set the configuration name to something relevant to that project. If you are migrating your project once, select the “One-way migration” as the Workflow Type.
- If you are migrating from different domain – that’s fine, as the server selection dialog will offer you to use different credentials. Make sure you’ve set that user as TFS administrator!
- In the “Left Source” select the source server and project, the old one.
- In the “Right Source” select the target server and project, the new one.
- In Queries make sure that default query returns all work items you need to be migrated. If you need other work items, write your query there. You can use TFS project portal or Visual Studio to create your perfect query and test it.

- Click the “Edit XML”. In the dialog remove everything and replace it with the contents of the file, attached to this article. It’s not perfect, but it contains quite universal mapping for mentioned 3 schemas – CMMI, MS Scrum and MSF for Agile Software Development V5.0.
- Click “Save to Database”. This should start the process and it’s quite straightforward.
That’s like it, and it should do the trick. However, how to modify your XML file, for example – if you have fields not mentioned in that file?
How to modify the TFS Integration Platform XML configuration file
I am not going to teach you how to modify XML text file here. If you are using TFS, you know it by now. Although for editing the XML files I would propose using the Visual Studio 2010 Shell (downloadable from Microsoft for free) – perhaps the best XML editor out there.
You may notice, that attached file is not valid XML, and that’s how it should be. Because it’s only a part of XML file that will be compiled just before starting the migration process. So leave that error as is.
You will also see some commented lines, which were left there intentionally. However, the main question is – how to get the list of schema fields and compare them with target schema, in order to add them to the XML configuration file?
To do that, you will need utility called witadmin, which is a part of Team Foundation Server Command-Line Tools. You can run that command from the Visual Studio Command Prompt.
Run the Visual Studio Command Prompt, and issue this command:
witadmin listfields /collection:https://YOUR_TFS_SERVER_NAME:8080/tfs/COLLECTION_NAME >tfs.txt

This will list all fields used by projects in mentioned project collection, and put result into the text file called tfs.txt. You can inspect that file later and see what fields are used by what project and even by what work item. In the example below, you see that field Microsoft.VSTS.Common.ActivatedBy is used by two projects, with list of work item types that consume that field.
It also shows you the type of that field (you should always migrate fields of the same type, meaning that migration of String field to DateTime would fail) and the name used by the schema. It is possible, that the same field could be displayed in different schemas by different names.
When you find a new field and find it’s counterpart in another schema, just add another field mapping entry into your XML schema file. If you want to drop the field, you can add yet another mapping entry, but use an empty string (“”) as the RightName attribute, so the field will be dropped during migration.
Important note is that migration does not change the source project at all, so if it fails, you can always try again or continue using the old project. If your team member suddenly made changes to the source project which you wouldn’t like to painstakingly copy to the new project, you can repeat the migration step, it should only migrate new, not yet migrated items.
After you successfully migrate your project, it’s a good idea to put your old project offline (or at least modify access to allow read-only connections only) and ensure you’ve adjusted the settings of your new project accordingly to the best practices.
I hope describe what I consider the best practices for Team Foundation Server in one of the upcoming articles.
Scrum_Migration_XML.7z (986.00 bytes)