SSD are very popular these days. I can tell for myself - in all of my laptops I have SSD drives, and if it has more than one hard drive installed, at least one of them is SSD. My main laptop has rather interesting construction – it has only one standard size 2.5” hard drive, and a slot for M2 form factor SSD drive, which looks more like a microscheme than a “hard drive”. For me this means, that I have small capacity SSD (128Gb in my case) and large HDD, thus having good compromise between large capacity and performance.
With 128 and less of space, it doesn’t look like a good idea to migrate OS to such drive. Windows itself will take half of it, and then you would have to watch out for temporary files and whatever installation packages, so they wouldn’t install stuff that doesn’t require high performance storage, on SSD.
On the other hand, if you have a large existing hard drive with 500Gb of space taken over the years of work and play, migration to smaller SSD would be tricky.
Migrating to smaller SSD
Although it’s a bit off topic, it is also a very common problem. People having more stuff on their existing hard drives than available on their shiny new SSD. In that case, you would need two instruments – one to find and deal with old large files, and second – to migrate only the OS, and leave other files on the old hard drive (in case of a laptop you could then buy an external case for your old HDD and use it through USB 3.0).
Absolutely fabulous tool to find large files, the one that just recently allowed me to get rid of about 50% of unneeded files on my main computer, is WinDirStat. It’s free, open-source, high performance and user-friendly. It will scan your hard drive and present a good looking drive map. You will see what kind of files take most space and where they are.
Second thing you will need for migration is Paragon Migrate OS to SSD – the app name tells what it does. It deals with situations when you want to migrate your operating system to new SSD drive, but can’t use other migration tools, because destination drive is smaller than source. You will be able to select your Windows directory (perhaps with others, like Microsoft Office one) and they will be migrated to new drive.
Migrating particular applications only
In my case, I didn’t want to migrate OS to new SSD. First of all – most files in Windows directory don’t require fast performance storage, so wasting half of SSD to it for a bit faster system startup seemed suboptimal. Second reason to not migrate OS to SSD is reliability of the latter. It’s quite common for SSD drives to stop working – perhaps, not as often as conventional Seagate hard drives, but when it happens it’s way harder to recover data from such drive. With normal hard drive, it can be disassembled and plates analyzed – not the cheapest option, perhaps, but still an option. With SSD, analysis sometimes is more expensive than data. And secure deletion of data is nearly impossible, because you don’t control the physical location of it – SSD is trying to use cells equally, not over-using ones, like it may happen in normal hard drive.
So, what I wanted to do – I wanted to migrate particular applications, that would definitely benefit from faster storage. These include Visual Studio, some games, Google Chrome. And I definitely didn’t want to reinstall them to new locations as it would take a lot of time and sometimes it’s tricky or “impossible” to do that.
Using NTFS junction points
Windows file system, the NTFS, has a feature called “junction point”. It works like a shortcut (or CNAME in DNS, if you prefer) – excerpt that application believes that your file is on drive A, while it’s actually on drive B. It’s a feature of the file system and is fully transparent for application. “What could go wrong” kind of thing.
We can move directory from one location to another, then create junction point in original place and make it point to the new place.
I am using this trick quite often – especially on production servers in the cloud, where system drives are too small, and some directories can be moved to other drives – not necessarily faster, just bigger ones. As you can see, this trick can be used not only to speed up some folders, but also to expand the capacity and load-balance.
Automating directory migration
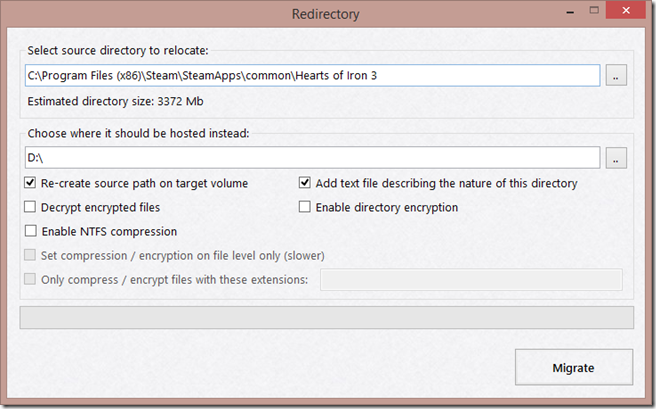
I didn’t want to do it manually all the time. It’s dull and time consuming. I wanted to point at the source directory, choose the destination drive, and press one button. That’s how ReDirectory was born.

In this example I moved a computer game from drive C to SSD drive. This particular item loads 5 times faster when it’s located on SSD, and that’s because of huge resource files, especially loading thousands of small files – that’s where SSD shines most.
I also added some “nice to have” features like adding NTFS compression or NTFS encryption to target directory – this might be useful when migrating rarely used files to bigger and slower drive.
It re-creates the source path on target directory, i.e. in example above the path was replicated on drive D:

Migration using junction points won’t fool everyone – Windows Firewall would ask you for permission again, as it sees the actual path of the file.
How it works
First, you select the source directory. For example, I’ve seen that Google Chrome slows down the booting of my computer by a few seconds, so I decided to move it to SSD. The initial directory for Chrome was "C:\Program Files (x86)\Google\Chrome". Note, that some directories might be in use, and therefore this operation can only be done in Safe Mode. We’ll speak about it later on.
Then, you select the destination directory. Usually I select the root directory of the target drive and check the “Re-create source path on target volume”. It adds some structure and order, as it’s easy to understand that this directory contains working files, and not delete it by mistake, thinking it’s and old backup or something.
This way the path of the application will stay the same, but the drive will change.
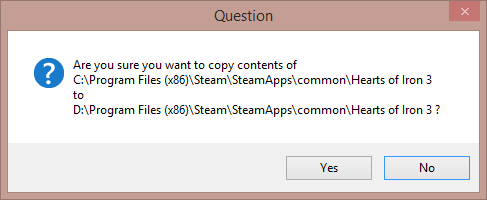
Click “Migrate”. It will check that target drive has enough space to keep the source directory and that both drives are NTFS – formatted and fixed (i.e. not external usb drives). Then, it will rename the source directory. This will ensure that no files are in use or will be accidentally blocked by any application during the migration.
Then, it will create the target directory and copy files from source directory to the target. If directory level encryption or compression was selected, it will be applied before the file copy procedure, hence copying will include automatic compression or encryption.
Next step – it will delete the source directory and create junction point instead. That’s it!
In order to not re-invent the bycicle, ReDirectory doesn’t perform copying and junction point creation by itself. For copying, it uses the XCOPY utility (part of Windows), and for junction point creation – free Junction utility by Sysinternals (part of Microsoft).
When directories are in use
If any application is blocking the file in source directory, you can’t proceed without first eliminating the lock. Sometimes it’s easy – when you have a document opened by text editor, just close that document and it should do the trick. In some cases, however, the file may be blocked by system process or the app that you can’t kill or find. In that case, you need to restart your computer in safe mode.
In ReDirectory folder, you can see sub-folder called “Scripts”. It contains two executable batch files – one to restart computer normally, and second – to restart computer in safe mode. You can open these files using notepad to see what they do, they are plain simple.
So, to restart your Windows computer in safe mode, run the rebootsafe.bat. Then, while in safe mode, perform directory migration using ReDirectory. Then, run the rebootnormal.bat to boot into normal mode.
Installing ReDirectory
Here is the installation file: ReDirectorySetup.exe [1 Mb]
And here is just collection of files: ReDirectory_Files.rar [90 Kb]
The difference between setup package and plain archive is that first will check whether you have .Net framework installed, and if not – will offer to download and install version 4.6.1 of it. And, of course, it will create location in Program Files. However, I do tend to keep utilities like this in one directory, hence the plain archive.
Warranty
None, obviously. I do guarantee, that this is not a malware, that it doesn’t require Internet access etc, but this is a system tool, the one that works with files and therefore has potential to kill them in process. It’s up to you to get used to this utility and backup your files at least prior to the first few runs.