Sometimes I need to copy large files simultaneously to several tens of computers. Like – Hyper-V virtual machines for training courses, and sometimes they take up to 60 Gigabytes. Usually these files reside on a single file server, connected to the local network by 1Gbit NIC, but even if nothing else is taking the bandwidth from that file server, copying 60 Gb to 20 machines would take more than 11 hours – that’s the amount of time it takes to transfer 1200 Gb at the speed of 30 Megabytes per second.
I wanted to reduce the overall time of deployment to about 70-90 minutes, or about 10 times. And this article is about how I’ve accomplished that goal.
Here is the scenario: in our company, we have to regularly deploy virtual environments to tens of machines, at least twice per week. We have a repository of virtual environments – collections of virtual machines that need to be copied and imported to workstations.
Even if you give the “copy” command remotely, it’s the process which could be stopped in the middle by one of a thousand reasons, and it also puts a heavy load on file server and eats traffic of your file server, because all copies of the file are served from one location and the hard drive of the server could be overloaded, no matter how big the cache is.
So, the first thing that came to my mind was torrent. For those of you who don’t know exactly how it works – a brief introduction.
How Torrent Works, at glance
Basically, each file is split into “chunks” or “fragments” with size from 64Kb and up to 2Mb. Usually there are about a thousand chunks in one torrent. Each of them has it’s own checksum. Once your torrent client receives the chunk, it calculates the checksum of the received fragment and if it’s correct – saves it, otherwise discards the fragment and re-downloads it.
The beauty of torrent protocol is that every torrent client is sharing what he got with other participants, so even if your server goes down, the clients would share the fragments they’ve got from you with each other and every new participants.
Benefits of Using Torrent in Local Network
The architecture of typical office LAN usually contains a switch on each floor of the building and a single cable between those floor switches, meaning that all workstations on the floor share the same 1 Gbit connection to the file server, while they may have separate connections to each other of the same speed. This way, every workstation on the 3rd floor may have 1Gbit connection to each other, but they all share a single 1Gbit connection to the 2nd floor, so if your file server and clients are on different floors, speeds could drop dramatically.
When we are using torrent to spread the file, our file server could give a particular fragment to the first workstation, and other 20 workstations would then have a choice to either ask file server or the first workstation for that fragment. Most likely, each of them will get different pieces of the target file from the file server, and then share these pieces with each other, at the speed higher than they have with the file server (because of the network architecture I’ve described above). This also works great if there is a slow VPN between your file server and clients.
In the end you will find out that your file server used traffic equal to about two copies of the target file, while the rest of the burden was shared between the workstations.
However, these are just the direct benefits. There are also additional features of the torrent quite useful for deployment purposes.
First of all, you always know who is participating in file deployment, because all clients are in the list of peers. So you have all progress bars in one window. Second, they all finish simultaneously, without you having to wait for the last copy to be deployed. Even if you forgot to deploy the files to the last workstation, and even if other workstations already got about 80% of the files, once you start the process on the new workstation, it would quickly reach the level of others. That’s because each workstation is getting pieces from all participants.
No Client Deployment
I didn’t want to deploy the torrent client on any machine. In fact, I didn’t even want to go and do anything at the target machines. I wanted to sit at my chair and let the workstations do their job, somewhere in another corner of the building, or even at the remote location.
The idea is that I only know the names of the computers, or their IP addresses, and the target machines are switched on. And, of course, I do have the administrative privileges – at least I know the administrator’s login and password. That’s it.
Well, one more thing – I want everything to be done by clicking a single button, instead of running a command for each workstation. Or running a command at all, even though I like working with command line interface, as you may notice from my other programs. The problem is that when you have a long list of things to do and you are in the middle of something, the last thing you want is to remember the nuances of the command you have to run in order to do something that would affect a lot of computers.
So, I didn’t install anything on the target machines, apart from Windows.
The Tool
I quickly figured out how to do it. There are two free tools that could facilitate the process, but I had to automate them, otherwise I would need to write a manual about how to use them. Then the manual would be lost and after some time I would only remember that there was a way to do it.
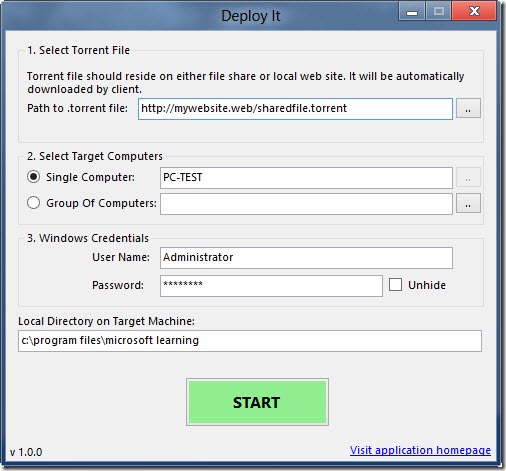
The interface, as you can see, is clean and simple.

So, here it is – the DeployIt utility (sorry, there was no time or necessity to find a better name) which acts as an orchestrator for the whole deployment process.
It’s very simple and straightforward. First, you create a torrent file (see below for the instruction on how to do it), then you specify the target computer or a list of computers (a simple text file with one name or IP address of the target computer in each line), and if needed – administrative credentials that works on each of these machines.
Then you click the “Start” button, and the process begins. Very simple and straightforward.
Behind The Scenes
DeployIt is using two utilities – first one is PsExec by Microsoft (part of SysInternals utilities) and second is one of the most popular torrent clients - uTorrent. The first utility is used to copy and start uTorrent on target machine, while the second is actually downloading the file without having to install torrent client on the computer. I would like to emphasize on the moment that uTorrent is not installed on the target machine – it is uploaded and run, but using the special /NOINSTALL command line parameter allows to use it without actual installation.
As you can see in the screenshot, the first thing this program needs is the torrent file, and it has to reside on either local file share or on a web site, which could be local as well.
How To Create and Deploy The Torrent File
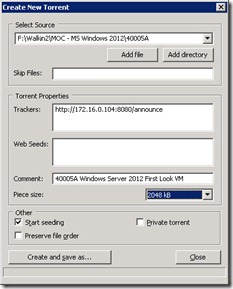
That’s an easy part. You will need to run the uTorrent program on your computer in order to do that. In case the files are huge – it’s better to do on the file server that already has the source files locally. That’s because during the creation of the torrent file, the uTorrent is going to calculate the checksum of each fragment, and so it would read every byte of these files, meaning that files would be downloaded. For really big files that could take hours, so create torrent files on file server.

As you can see, you have to specify the Trackers before your torrent file is created. In our case, we’ll have to use our own tracker, and we’ll use the same uTorrent’s tracking functionality for that. More about it later.
Once you click on “Create and save as…” button, and select the name for your new torrent file, uTorrent will start the torrent file building process – it will read each byte of your files and will create checksum for each piece of the torrent. This operation may take several minutes to complete.
Once it’s done, you’ll have to copy the torrent file to the file share or web site where it will be accessible for other torrent clients – the ones that are going to retrieve your large files.
Next thing – run the DeployIt, fill it with required information and click Start. If everything goes right, all computers will start downloading your files in a few seconds.
Setting Up The Tracker
As I said previously, we are going to use one uTorrent client as the tracker. This is the easiest way to provide tracking to your torrents, but you must be careful to not allow any other 3rd party torrent files be served by that machine, as it will become tracker for them all and it could be undesired.
Here is the check-list of the things you need to do in order to set up uTorrent to work as the tracker:
- Install uTorrent on one machine, which is accessible by others. Make sure that firewall exception is set and that you have a static (not dynamic) port in uTorrent settings.
- Go to Advanced settings of uTorrent and in the list of all possible options find the bt.enable_tracker setting. Double-click it and set the value to “true”.
- If you set up the WebUI feature of uTorrent, it’s important to note, that the port you set in WebUI will be the port used by tracker. As you see in the screenshot above, we are using the port 8080 for a tracker, and that’s the actual WebUI port. If you are not using WebUI, then the port will be the one you set for the general connectivity (see step 1).
- Write down the IP address and port of your tracker. You will need it when creating torrent files. Make sure you add /announce to the end of the http url, so it will look like https://TrackerIP:Port/announce.
More Complex Scenarios
In a scenario, when you have to deploy files to remote location, and only one or a few, but not all participants are able to contact the tracker, this is not a problem. uTorrent is using the DHT (distributed hash table) by default, which would allow them to find all participants around and effectively share the content. However, they will need to acquire the torrent file, so make sure it’s accessible.
Resume
There is always more than one way to skin a cat. However, this method is suitable for most scenarios, as it is hassle-free, takes less time, saves traffic and makes the ETA known for sure.
Download DeployIt
Here is the link to the MSI (Microsoft Installer) file for DeployIt. It already contains a copy of uTorrent and PSExec utility. You might want to make sure you have the latest uTorrent, but most likely it won’t be necessary, because you are not going to install it (excerpt for a copy or two on file server(s)).
DeployIt.msi (1.4 mb)